

What Happens If You Only Have an MP3 of the Beat?
The Problem: One Stereo File Limits Every Decision
An MP3 beat creates a difficult mixing situation because every instrument shares one stereo file. Any equalizer move aimed at the bass also changes the kick, sample, and percussion. Compression reacts to the combined signal instead of the element causing the problem.
This becomes especially restrictive when the vocal needs space inside a beat that already sounds finished. The MP3 format also carries decisions made before the file reached your session. Its lossy compression reduces data to create a smaller file, and the resulting quality depends on the encoding settings and source material.
Those limitations become more noticeable after heavy equalization, limiting, or stem separation. The Library of Congress MP3 format description provides additional technical information about the format. The source quality still determines how far the finished mix can be pushed.
The Principle: Separate the Elements Before You Process Them
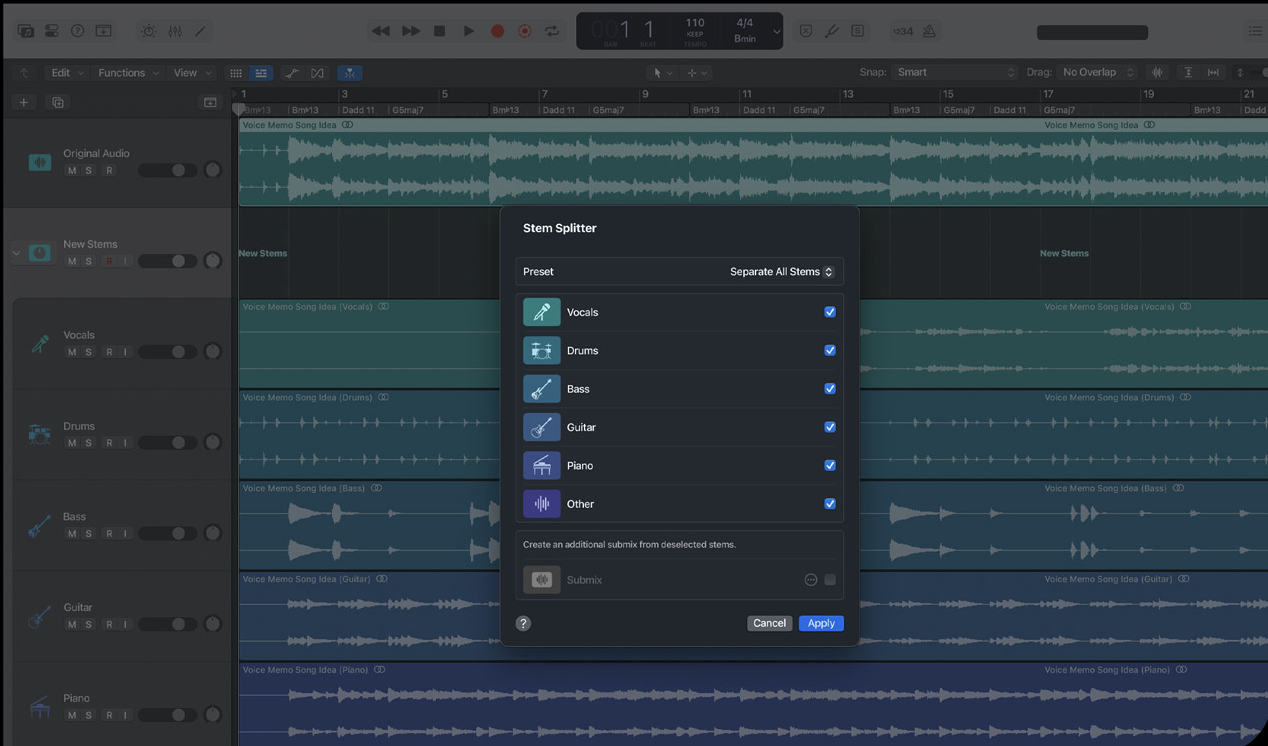
Stem separation gives you several controlled tracks instead of one fixed, blended one. Logic Pro’s Stem Splitter can extract parts such as vocals, drums, bass, guitar, piano, and other instruments from an audio region. The available results depend on the contents and condition of the source file.
Processing the generated stems separately creates useful control, but every decision must support the reconstructed beat. The separated tracks should combine into a result that feels stable, deliberate, and close to the original groove.
Apple provides operating instructions in its Logic Pro Stem Splitter guide. Review the available stem options before deciding how much separation the arrangement requires. More stems can create more control, but they can also expose more artifacts.
Prepare the MP3 Before Stem Separation
Create a new Logic Pro project at 48 kHz before importing the beat. Logic allows the project sample rate to be selected through the audio project settings. It can also convert imported files to match the current project rate.
Convert the MP3 into a 48 kHz, 24-bit WAV or AIFF file before the main processing begins. The original MP3 defines the available detail, while the conversion creates a stable uncompressed working file for editing, routing, and printing. The 24-bit format also provides practical room for gain changes and additional processing inside the session. Most importantly, as you bring in processing, it’s done against a 24 bit piece of audio. While this doesn’t icnrease the real fidelity of the original 2 track, processing the stems at hig bit rate will make the plugins or outbard gear results sound more solid.
Set the imported beat at a conservative level before running Stem Splitter. Leave several decibels of headroom and remove any automatic normalization from the workflow. Apple explains the relevant settings in its Logic Pro sample-rate guide.
Split the Beat Into Stems in Logic Pro
Place the converted audio file on a clean track and select the entire region. Open Stem Splitter and choose the parts that best match the arrangement. A typical hip-hop beat may separate into drums, bass, vocals, and an “other” stem containing samples, keyboards, strings, or effects. But sometimes, I also prefer guitars to be separate. It just depends.
Run the process once and keep the original stereo beat available on a muted track. The original file provides a constant reference for balance, impact, and stereo width. Logic creates new audio regions for the extracted parts, allowing each stem to receive separate processing and automation.
Name and color the resulting tracks before making tonal decisions. Clear organization matters because separation can create similar-looking waveforms with very different functions. Route all generated stems into one instrumental bus so the reconstructed instrumental can be compared against the original file.
Check the Generated Stems for Artifacts
Listen to each generated stem by itself before adding processors. Common artifacts include watery cymbals, unstable bass notes, softened drum attacks, and fragments of one instrument appearing in another stem. These sounds often become more obvious when a stem is soloed than when the complete beat plays.
Next, listen to all stems together with every fader at unity gain. Compare that reconstruction against the original MP3 at matched loudness. Small tonal differences are expected, but large losses in impact or width require a more careful balance before processing begins.
Use polarity checks when the low end feels weak or unfocused. Stem-separation systems can distribute related low-frequency material across several files. A small timing or phase relationship between those files can change the kick and bass when they recombine.
Rebuild the Balance Before Processing
Begin with the drum stem and raise the bass underneath it. Add the musical stem afterward, then bring in any remaining material. This order makes the low-frequency structure easier to judge before samples and sustained sounds fill the center.
Match the original beat’s energy before trying to improve it. Pay attention to the kick level, bass sustain, sample width, and snare position. The reconstructed version should carry the same musical intention while providing more room for the vocal.
Keep the original MP3 muted most of the time and check it at regular intervals. Constant switching can slow the work and encourage unnecessary corrections. Brief comparisons reveal whether the rebuilt beat still carries the original movement and weight.
EQ Each Stem According to Its Role
Use equalization to solve conflicts that were impossible to reach inside the stereo file. The drum stem may need a small reduction where the vocal body feels crowded. The music stem may need controlled space around the main vocal presence range.
Treat the bass stem according to its relationship with the kick. A narrow reduction can create room for the kick’s fundamental, while gentle harmonic emphasis can improve bass translation. Avoid large boosts because separation artifacts often become harsh when pushed.
The music stem usually requires the most restraint. Samples, keyboards, and effects may already contain broad tonal shaping from the original production. Use small moves that create vocal space while preserving the character that made the beat work.
Control Dynamics Without Exposing Separation Errors
Compression can stabilize a separated stem, but aggressive settings often reveal the processing artifacts. Fast attack times may flatten drums that already lost some definition during separation. Long releases can pull background fragments forward between important sounds.
Use compression when a specific stem has inconsistent movement. Let the drum attack pass before controlling its body, and use gentle gain reduction on musical material. The beat bus can provide additional cohesion after the individual stems feel balanced.
A clipper or limiter may help control occasional peaks on the reconstructed beat. Keep that processing light because the source has already passed through MP3 encoding and stem generation. The final vocal mix still needs enough peak movement for mastering.
Add Analog Warmth After Up-Conversion
After the stems are balanced, use analog warmth to compensate for the thinness that up-conversion and separation can expose. Harmonic processing can add density to the bass, strengthen the drum body, and help the music stem feel continuous. The lost MP3 detail remains part of the source, while the added harmonics make the rebuilt instrumental feel fuller and more connected.
True analog boxes often reach this result faster than extended plugin adjustment. A transformer, tape stage, or colored amplifier circuit shapes harmonics, transients, and density through one responsive path. Apply that color to individual stems when one area needs help, or use it across the beat bus when the whole instrumental feels disconnected.
Listen for stronger relationships rather than obvious distortion. The kick should retain its front edge, the bass should gain presence, and the sample should feel deeper without becoming cloudy. Match the processed and bypassed levels before choosing the final setting.
Recombine the Stems Around the Vocal
Bring the vocal into the session before finishing the beat processing. A reconstructed instrumental can sound impressive alone while leaving insufficient room for the performance. Make the final tonal and dynamic decisions with the vocal carrying its intended position.
Use the separated stems to create space where the vocal actually needs it. Lower the music stem slightly during dense phrases, control the drum stem around sharp consonants, or automate the bass when sustained notes crowd the vocal body. These small moves preserve more of the beat than broad processing across the original MP3.
Route the completed stems through one beat bus and compare that bus against the original file. The rebuilt version should support the vocal more effectively while retaining the beat’s identity. Print the beat bus at 48 kHz and 24-bit so the session keeps one stable working format.
Common Mistakes When Processing Generated Stems
The first mistake is treating each separated track like an original multitrack recording. Generated stems contain shared information and separation residue, so aggressive processing can expose their boundaries. Make decisions while the full beat plays and use solo listening mainly for diagnosis.
The second mistake is trying to remove every artifact. Some fragments help the stems combine naturally when they return to the full arrangement. Excessive cleanup can create holes, unstable ambience, or a narrow stereo image.
The third mistake is using the new control to redesign the production. The artist chose the MP3 because that beat already carried the intended rhythm and mood. Preserve those choices while creating enough room for the vocal and final master.
Tools and Inputs
The essential inputs are the highest-quality MP3 available, Logic Pro with Stem Splitter, and a 48 kHz project. Use 24-bit WAV or AIFF files for the converted source, generated stems, and printed beat bus. Keep every working file in the same format to prevent unnecessary conversion between stages.
Useful processors include a transparent equalizer, flexible compressor, saturation stage, clipper, and dependable loudness meter. Analog equipment can provide fast harmonic shaping when the stems need density and cohesion. Reliable monitoring remains important because separation artifacts often appear in quiet ambience and high-frequency detail.
The original MP3 should remain available throughout the session. It provides the reference for the producer’s balance, drum impact, and stereo presentation. Compare it at matched loudness before committing to the rebuilt beat.
Final Processing Checklist
Convert the MP3 to 48 kHz and 24-bit before building the working session. Split the beat into useful stems, inspect the files, and reconstruct the original balance before applying equalization or dynamics. Keep the original MP3 available for brief, level-matched comparisons.
Process the stems according to their musical roles and keep the vocal present during final decisions. Add analog warmth where the converted and separated material needs density, then recombine everything through a controlled beat bus. Print the finished instrumental at 48 kHz and 24-bit with enough headroom for mastering.
All Categories
About Dume41

Dume has been producing, recording, and mixing hip hop records since 1996, and mastering them since 2005. He is the founder of the record label Fresh Chopped Beats, where he has worked on music featuring artists such as Abstract Rude, Afu-Ra, Gabriel Teodros, Geologic/Prometheus Brown, Jeru The Damaja, Khingz, King Khazm, Macklemore, Percee P, Sean Price, Sir Mix-A-Lot, Sizzla, Specs Wizard, Vitamin D, and many, many others. His mastering chain is built around a high-end analog hardware setup designed to add depth, warmth, and polish while keeping the artist’s intent intact. To work with Dume on music contact him here.